Crosssections, What is it ?
Basics
The crosssections class is the way to manage a collection of profile.
Import
[ ]:
import numpy as np
from pathlib import Path
import matplotlib.pyplot as plt

from wolfhece import is_enough
if not is_enough('2.2.47'):
    raise ImportError("This code requires wolfhece version 2.2.47 or higher. -- try pip install wolfhece --upgrade")

from wolfhece.wolf_array import WolfArray, header_wolf as hw, WOLF_ARRAY_FULL_SINGLE, WOLF_ARRAY_FULL_INTEGER
from wolfhece.pydownloader import toys_dataset

from wolfhece.PyCrosssections import profile, crosssections
from wolfhece.PyVertexvectors import Zones
How to initialize?
An instance of crosssections can be initialized in several ways:
With a
ZonesobjectBased on a
.veczfileFrom text files containing profile coordinates (formats
SPW 2000,SPW 2022)From Excel files (format
SPW 2025)From a
.sxytext file (WOLF/VB6/Fortran format - for backward compatibility)
Stored information
The different profiles are stored in a dictionary of dictionaries: myprofiles.
The keys of the main dictionary are the profile names (string). Each profile is itself a dictionary containing the following information:
cs: theprofileobject (instance of theprofileclass)index: an indexleft: the left bank vertexleft_down: the left bank vertex at the bottom of the slopebed: the bed vertexright_down: the right bank vertex at the bottom of the sloperight: the right bank vertex
At initialization, the elements left, left_down, bed, right_down, and right are pointers to instances of the wolfvertex class. However, it is possible to move these reference points based on:
an index in the profile’s vertex list
a 3D curvilinear coordinate (on the profile line)
another vertex (instance of the
wolfvertexclass)
See in particular the Enum class postype for the possible options.
Dependencies
The class is designed to be displayed in a graphical WOLF instance. It therefore inherits from the
Element_To_Drawclass.It is possible to visualize the profiles with LAZ data overlay. To do this, you can link a directory of LAZ files to the
crosssectionsinstance at initialization via thedirlazargument or later via thegridlazattribute of typexyz_laz_grids.
Sorting along a vector
After importing a collection of profiles, it is possible to sort them along a given vector. This sorting is performed by the sort_along() method. Its purpose is:
to select the profiles that intersect this vector
to sort them according to their position relative to this vector
Thus, after sorting, the profiles have three additional attributes that allow you to browse the list of profiles in the order of the sorting:
up(profile): the profile upstream of the current profile (None if it is the first profile)down(profile): the profile downstream of the current profile (None if it is the last profile)s(curvilinear coordinate along the vector - 0.0 is the upstream end of the vector)
The sorted profiles are stored in the sorted attribute, which is a dictionary of dictionaries sorted by their s value:
sorted: a list of profiles sorted by theirsvaluesupport: the vector used for sorting
Example
Sur base d’anciens profils de la Vesdre et de la Hoëgne.
[2]:
all_profiles = crosssections(fn_or_Zones = toys_dataset('Profiles', 'profiles.txt'),
                        format='2000',
                        dirlaz= None)
supports = Zones(filename= toys_dataset('Profiles', 'support.vec'))
ERROR:root:HTTP error occurred while downloading https://gitlab.uliege.be/HECE/wolf_examples/-/raw/main/Profiles/support.vec.extra: 404 Client Error: Not Found for url: https://gitlab.uliege.be/HECE/wolf_examples/-/raw/main/Profiles/support.vec.extra
[3]:
print('Number of profiles:', all_profiles.nb_profiles)
print('Support names:', supports.mynames)
Number of profiles: 1449
Support names: ['Tout Vesdre', 'Hoëgne']
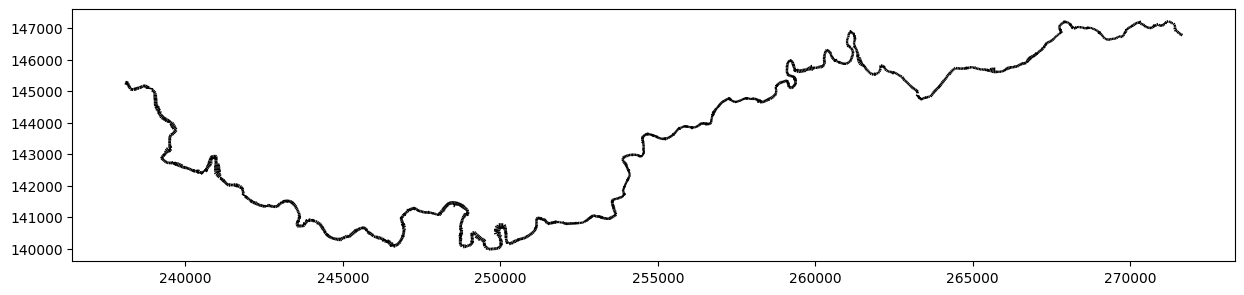
How to plot ?
A crosssections instance does not inherit from Zones. To perform plots, we need to set the myzone attribute, which allows us to manipulate cross-sections in a similar way than vectors.
To do this, call set_zones.
[10]:
all_profiles.set_zones()
fig, ax = all_profiles.myzones.plot_matplotlib()
fig.set_size_inches(15,7)
ax.set_aspect('equal')
Sort along
[16]:
all_profiles.sort_along(supports[('Tout Vesdre', 0)], # Sort along the first support vector of 'Tout Vesdre' zone
                        'Vesdre',         # Set the name
                        downfirst= True)  # The support vector is oriented downstream to upstream (so we reverse it)

# Keys are the names given in sort_along
print('Keys :', all_profiles.sorted.keys())

# Upstream profile is the first one in the sorted list
upstream_sorted = all_profiles.sorted['Vesdre']['sorted'][0]
print('Upstream profile name:', upstream_sorted.myname)

prof1 = all_profiles['1']
assert prof1 is upstream_sorted, "Upstream profile should be profile '1'"
Keys : dict_keys(['Vesdre'])
Upstream profile name: 1
Upstream/Downstream profile
Sorting profiles is a good option to set the up and down attributes, but you can do it manually if you want.
If this is the case, you can retrieve the upstream or downstream profile using the get_upstream and get_downstream routines.
[ ]:
up = all_profiles.get_upstream()
assert isinstance(up, dict), "Upstream profiles should be returned as a dictionary"

# up is a dictionary.
# 'left', 'bed' and 'right' keys give the position of the left bank, bed and right bank in the profile
print(up)
{'index': 0, 'cs': <wolfhece.PyCrosssections.profile object at 0x000002E6D4F09E50>, 'left': <wolfhece.PyVertex.wolfvertex object at 0x000002E6D4F10E10>, 'bed': <wolfhece.PyVertex.wolfvertex object at 0x000002E6D50FBB50>, 'right': <wolfhece.PyVertex.wolfvertex object at 0x000002E6D4F10E90>, 'left_down': None, 'right_down': None}
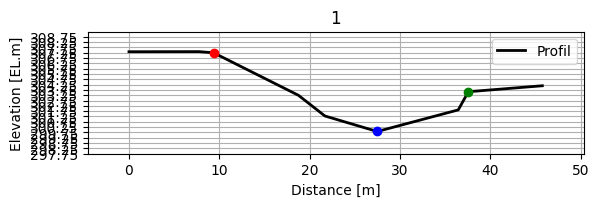
[26]:
up_profile = up['cs']
assert isinstance(up_profile, profile), "up_profile should be profile"
up_profile.plot_cs()
[26]:
(9.37011026630361,
 27.49005555503184,
 37.58004275439383,
 307.24,
 299.84,
 303.58)
[27]:
down = all_profiles.get_downstream()
down_profile = down['cs']
assert isinstance(down_profile, profile), "down_profile should be profile"
down_profile.plot_cs()
[27]:
(1.9999952249853712,
 38.800036292232996,
 66.50001731070876,
 64.46,
 62.06,
 62.76)

Iterate from profile to up/down
You can iterate over profiles starting from a given profile and move upstream or downstream.
A the extremities, up or downattribute will point to the same profile.
For example, you can write:
[38]:
prof = all_profiles.get_upstream()['cs']
i=0
while prof.down is not prof:
    # do action
    i +=1
    prof = prof.down

print(i)
1446
Select profile
You can find the nearest profile using :
select_profileroutinea call to the defined getitem routine
[35]:
nearest_routine = all_profiles.select_profile(271500., 271650.)
print(nearest_routine.myname)

nearest_getitem = all_profiles[(271500., 271650.)]
print(nearest_getitem.myname)

assert nearest_routine is nearest_getitem, "Both routines should return the same profile"

nearest_getitem.plot_cs()
14
14
[35]:
(12.969939275478346,
 21.40993680480821,
 32.239989571965154,
 296.76,
 295.4,
 297.64)

And more…
The Crosssections object can be integrated with the Interpolators class to generate triangulations and perform data interpolation on digital elevation models (DEM).
This enables advanced spatial analysis and visualization of river profiles and related topographic data.